Welcome to my comprehensive guide on caring for bromeliads, stunning indoor tropical plants that can bring vibrant beauty to your home. As a professional, I have seen firsthand the joy and satisfaction that come from successfully growing these unique plants. In this guide, I will share expert tips and advice on the best practices for bromeliad care, so you can enjoy their beauty for years to come.
Key Takeaways:
- Bromeliads are stunning indoor tropical plants that can bring vibrant beauty to your home.
- Proper care and maintenance are necessary for these plants to thrive.
- When choosing a bromeliad, factors include where to find them, different varieties available at garden centers, and important information to look for before purchasing.
- Bromeliads have specific environmental needs to stay happy and healthy, including ideal light conditions, temperature range, and humidity levels.
- Proper watering techniques are crucial for bromeliads, including how to water the plant’s central cup and when to water the soil.
Understanding Bromeliads: A Brief Introduction
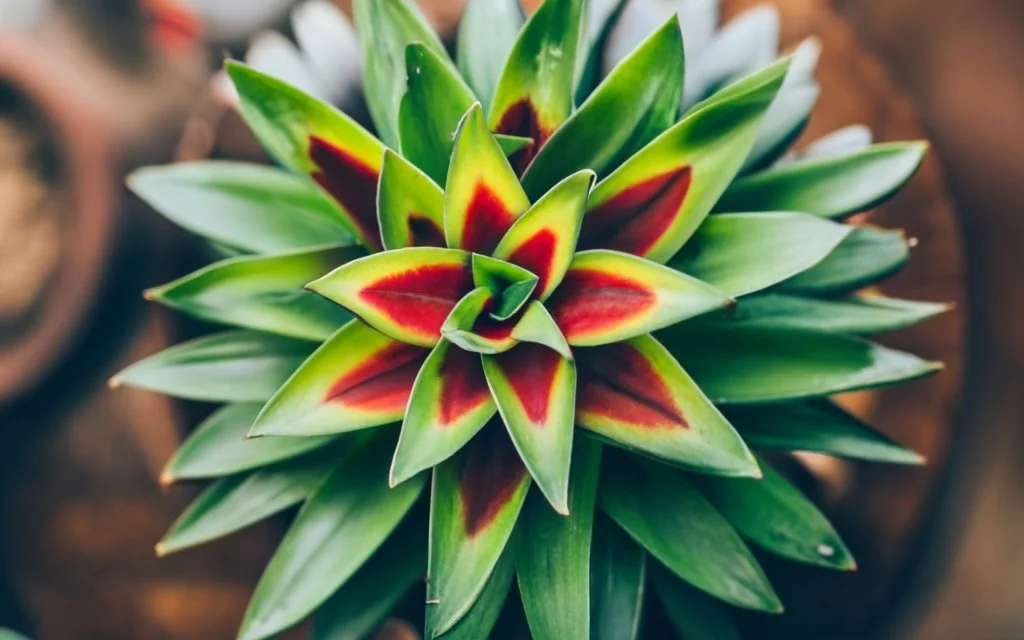
Welcome to the fascinating world of bromeliads! These tropical plants are known for their unique flower structures that come in a variety of shapes, sizes, and colors. From the striking reds and pinks of the Aechmea to the delicate white flowers of the Guzmania, there is a bromeliad for every taste and style.
Bromeliads belong to the Bromeliaceae family, which contains over 3,000 species. While they are native to the tropical Americas, they can be found all over the world in homes, gardens, and greenhouses. Some bromeliads are epiphytes, meaning they grow on other plants for support, while others are terrestrial and grow in soil.
Bromeliad plant flowers are truly a wonder to behold. Each flower stalk emerges from the plant’s central rosette and can last for weeks or even months. The flowers themselves can take on unusual shapes, such as the tubular flowers of the Vriesea or the star-shaped blooms of the Tillandsia.
When it comes to types of bromeliad flowers, the options are endless. There are tropical bromeliads with vibrant colors and patterns and more subdued varieties with delicate pastel hues. Some bromeliads even produce fragrant flowers that can fill a room with their sweet scent.
Bromeliads are a fascinating group of plants that can add unique beauty and interest to any American home. In the following sections, I will share my expert tips and advice on how to care for these tropical wonders to ensure they thrive in your care.
Choosing the Right Bromeliad: Factors to Consider
When it comes to selecting a bromeliad for your home, there are several factors to consider. The first step is finding a reputable garden center or nursery that offers a wide selection of bromeliad plants. You can search for a large garden center in your area or look for one that specializes in tropical plants.
Once you’ve found a garden center, inspect the available bromeliads and read the accompanying information. Look for healthy plants with vibrant foliage and avoid those with yellowing or browning leaves or signs of pest damage.
When choosing a bromeliad plant, consider factors such as size, shape, and color. Some bromeliads are compact and suitable for indoor display, while others can grow several feet tall and are better suited for outdoor planting. Determine your available space and choose a bromeliad that fits the environment.
It’s also important to consider the care requirements of the bromeliad you select. Some varieties require more light, water, or humidity than others. Make sure to choose a plant that is compatible with your lifestyle and available resources.
By considering these factors and selecting a healthy, suitable bromeliad plant, you’ll be well on your way to success with these stunning tropical wonders.
Creating the Ideal Environment: Light, Temperature, and Humidity
Planting a bromeliad in your garden or keeping it indoors requires specific environmental conditions for optimal growth. Let’s explore the ideal settings for your bromeliads to flourish.
Light Exposure
Bromeliads love bright, indirect light. Placing your plants near east or west-facing windows is ideal, where they can receive several hours of sunlight a day without direct exposure that could harm their leaves.
If your home doesn’t provide enough natural light, don’t worry! Fluorescent lights can work as an affordable and efficient alternative for indoor bromeliads.
Temperature Range
Most bromeliads are tropical plants requiring moderate temperatures of 60-80°F during the day and 50-70°F at night. Keep them away from air conditioning or heating vents, as they could dry out or damage your bromeliads.
Humidity
Bromeliads are epiphytes – plants that grow on trees or other plants without harming them. Therefore, they don’t require much soil and thrive on high levels of humidity instead.
If your home has low humidity, you can increase it by regularly misting your bromeliads with distilled water or placing a tray with rocks and water beneath the plant’s container. A humidifier can also work wonders for your bromeliads and other indoor tropical plants.
By following these guidelines for light exposure, temperature, and humidity, your bromeliads will enjoy a thriving indoor and garden environment.
Watering Bromeliads: Dos and Don’ts
Proper watering is crucial for the health and vitality of your bromeliads. When it comes to watering these stunning indoor tropical plants, there are a few key dos and don’ts to keep in mind.
Do Water the Central Cup
Bromeliads are unique in that they have a central cup that collects water. It’s important to water this central cup regularly to ensure your bromeliad has a good source of hydration. However, it’s important not to overfill the cup, as this can lead to root rot and other issues. Aim to keep the cup about one-third to one-half full of water at all times.
Do Water the Soil
In addition to watering the central cup, it’s also important to water the soil surrounding the plant. Bromeliads should be watered thoroughly but not too frequently. Aim to water the soil every two to three weeks, depending on the plant’s individual needs and the environment in which it’s grown.
Do Monitor Humidity Levels
Bromeliads require a humid environment to thrive. It’s important to supplement humidity levels in places with dry air by regularly misting the plant with water. You can also place a tray of water near the plant to add moisture to the air.
Don’t Overwater
Overwatering is one of the most common mistakes made in caring for bromeliads. Too much water can lead to root rot and other issues that can harm the plant. It’s important to ensure the soil is completely dry between waterings. If in doubt, err on the side of caution and waterless rather than more.
Don’t Water Too Late in the Day
Watering your bromeliads in the late afternoon or evening can lead to issues with fungal growth and other problems. Instead, aim to water your plants in the morning or early afternoon, giving them plenty of time to absorb the moisture throughout the day.
Don’t Use Hard Water
Hard water can contain minerals that can build up in the soil and harm your bromeliads over time. Use rainwater or distilled water to ensure your plants receive the purest hydration possible.
By following these watering dos and don’ts, you can ensure your bromeliads remain healthy and vibrant. Remember that every bromeliad is different, so be sure to monitor your plants closely and adjust your care routine as needed.
Feeding and Fertilization: Nourishing Your Bromeliad
Proper nutrition is crucial for healthy bromeliads. As an informed gardener, you may already have experience with general plant fertilization. Still, bromeliads have unique nutritional needs that require specific attention.
The best fertilizers for your bromeliad collection are those designed explicitly for these tropical plants, which you can find at garden and flower centers or flower and garden centers. Organic fertilizers are also a great option; many recipes are online.
I recommend feeding your bromeliads every few months with balanced, water-soluble fertilizer. Following the instructions on the product label is essential, as bromeliads are sensitive to over-fertilization, which can cause leaf burns or other issues.
If you notice any signs of nutrient deficiencies, such as yellowing or brown tipping of leaves, it may be time to adjust your feeding schedule or switch to a more suitable fertilizer.
Remember to observe your bromeliads carefully and adjust their feeding as needed to keep them healthy and thriving.
Repotting and Propagation: Refreshing and Expanding Your Bromeliad Collection
Once you’ve successfully cared for your bromeliads and watched them flourish, you may find yourself wanting to expand your collection. Repotting and propagation are two effective methods for doing just that.
Repotting Bromeliads
If you notice your bromeliad becoming root-bound, it may be time to repot. This is also a good opportunity to refresh the soil and check for pest or disease issues.
You can find a variety of pots and potting mixes at your local garden plant center, at home garden center, or home & garden center. When selecting a new pot, choose one that is just slightly larger than the current pot and has drainage holes at the bottom. Use a high-quality potting mix designed for bromeliads, or create your own mix by combining equal parts peat moss, perlite, orchid bark, and charcoal.
To repot, gently remove the bromeliad from its current pot and gently loosen any tangled roots. Place the plant in the new pot and add fresh potting mix, pressing it down gently. Water the plant thoroughly and allow it to adjust to its new home for a few days before resuming regular care.
Propagation Techniques
Bromeliads are unique in that they often produce offsets or pups, that can be propagated into new plants. This is a cost-effective way to expand your collection or share plants with friends.
To propagate, wait until the pup has grown to at least one-third the size of the parent plant. Carefully cut the pup away from the parent, making sure to include some of the base tissue. Allow the cut to dry for a day or two before planting the pup in a small pot filled with a well-draining potting mix. Keep the soil moist and provide bright, indirect light. Once the plant has established roots, you can gradually increase the light and move it to its permanent location.
With these techniques, you can refresh and expand your bromeliad collection to enjoy its stunning beauty throughout your American home.
Dealing with Common Pests and Diseases
As an informed gardener, it’s important to keep an eye out for common pests and diseases that can affect your bromeliads. At Gardeners Garden Center, we understand that even the most well-cared-for plants may run into issues from time to time. Here are some of the most common problems and how to address them.
Pests
Some pests that may attack your bromeliads include spider mites, mealybugs, and scale insects. If you notice webbing or tiny insects on your plants, it’s time to take action. You can remove them by wiping the leaves with a damp cloth or using an insecticidal soap. For severe infestations, you may need to use an insecticide specifically formulated for bromeliads.
Diseases
Bromeliads may also fall victim to bacterial or fungal diseases, especially if they are overwatered or kept in overly humid conditions. If you notice black or brown spots on your leaves, or if they start to wilt or rot, it’s important to act quickly. Remove any affected leaves and make sure your plant has proper drainage to prevent standing water. You may also want to consider using a fungicide or bactericide to treat the problem.
If you’re not sure what’s causing the issue with your bromeliads, bring a sample to your local garden center for diagnosis and treatment recommendations. You can keep your bromeliads healthy and flourishing by staying vigilant and taking prompt action.
Enhancing Your Bromeliad Display: Creative Arrangements and Care Tips
One of the best things about bromeliads is their versatility when it comes to display options. Whether you have a large indoor space or a small windowsill, there are plenty of creative ways to showcase your bromeliads. As a professional copywriting journalist, I have gathered some tips on enhancing your bromeliad display and keeping it healthy and beautiful.
Planting Companions
Bromeliads make great centerpieces in a larger garden display. Pair them with other tropical plants like ferns, orchids, or succulents to create a lush, vibrant arrangement. When choosing plants, make sure they have similar care requirements so as to not over or under-water certain plants. A garden and plant center can be a great resource for finding the perfect plants to complement your bromeliads and make a stunning garden centerpiece.
Creative Containers
Upcycling everyday items into creative planters is a fun way to showcase your bromeliads. Consider using vintage teapots, glass jars, or old boots as unique containers. Ensuring the containers have drainage holes is crucial for preventing root rot and other water-related issues. A center garden or flower center can offer a wealth of creative possibilities and be a great source of inspiration for your next bromeliad display.
Lighting and Placement
Bromeliads thrive in bright, indirect light. Avoid placing them in direct sunlight as it can lead to leaf burn, but also make sure they get enough light as they need it to produce flowers. Experiment with different locations in your home to find the best spot for your bromeliads. A garden and plant center can give advice on the right lighting for your plants.
Water and Feeding
Bromeliads don’t require a lot of water, but they do need regular feeding. Water them only when the central cup is dry, and avoid getting water on the leaves as this can cause bacterial build-up and disease. A garden and plant center will provide you with the right fertilizers to use for your bromeliads and a feeding schedule that suits your plant’s needs.
Final Thoughts
Creating a beautiful display of bromeliads is as much about care as it is about creativity. Whether you’re using traditional planters or upcycled items, the key is to provide your plants with the right amount of light, water, and nutrients to thrive and become the focal point of your space. Don’t be afraid to experiment, and remember to check out your local garden and plant center for further inspiration and advice.
Troubleshooting Common Issues: Solutions for Yellowing Leaves, Wilting, and More
Even with the best care, bromeliads may encounter common issues such as yellowing leaves, wilting, or lack of flowering. But don’t worry – these problems are often easy to fix. Here are some common problems and solutions:
Yellowing Leaves
If your bromeliad’s leaves are turning yellow, it may be a sign of overwatering, lack of sunlight, or nutrient deficiencies. Check the soil – if it’s consistently damp, scale back on watering. If the plant isn’t receiving enough light, move it to a brighter location. If the soil lacks nutrients, add a balanced fertilizer.
Wilting
Wilting is usually caused by under-watering, but it can also be a sign of root rot. Check the soil – if it’s dry, water your bromeliad thoroughly. Your plant may have root rot if the soil is consistently wet and mushy. To save the plant, remove it from the pot and trim away any affected roots. Repot in fresh, well-draining soil.
Lack of Flowering
If your bromeliad isn’t flowering, it may be due to a lack of sunlight or a deficiency in phosphorus. Move the plant to a brighter location or supplement it with a phosphorus-rich fertilizer.
Remember, prevention is always the best medicine – be sure to provide your bromeliads with the proper care from the start to help avoid these issues. But if problems arise, don’t panic, and follow these troubleshooting tips to bring your bromeliads back to health.
Seasonal Care: Preparing Your Bromeliads for Winter and Promoting Blooms
As temperatures drop and daylight hours shorten, your bromeliads require special care to survive the winter. Here are some tips to help you prepare your plants for the colder months:
Adjust Light and Temperature
Bromeliads need bright, indirect light but can be sensitive to direct sun. During the winter, move your plants closer to windows to maximize sunlight exposure and keep them away from cold drafts. Also, make sure the temperature stays above 60°F (15°C) to prevent damage to the plant.
Reduce Watering
Winter is typically a dormant season for bromeliads, so they require less water than during the growing season. Allow the soil and central cup to dry out between waterings, but don’t let the plant completely dry out. Overwatering can cause root rot, which can be fatal for the plant.
Promote Blooming
Most bromeliads bloom during the spring or summer months, but winter can be a good time to promote blooms. Place a ripe apple or banana in a plastic bag with your bromeliad for a few days to encourage flowering. The ripening process releases ethylene gas which can trigger blooming in some bromeliad species.
Additionally, fertilizing your bromeliads can also help promote blooming. Use a diluted fertilizer once a month during winter to provide enough nutrients to support flower development.
With these tips, you can help your bromeliads survive and thrive during the winter months. Remember to monitor your plants closely and adjust their care routine as needed. Doing so will reward you with vibrant blooms when the growing season returns.
Conclusion
In conclusion, caring for your bromeliads doesn’t have to be a daunting task. Following the expert tips and advice in this guide, you can ensure that your indoor tropical plants thrive and bring vibrancy to your American home. Always remember to understand your bromeliads by learning about their unique flower structures and types. When selecting your plant, consider factors such as where to find them and important information to look for before purchasing.
Creating the ideal environment with proper lighting, temperature, and humidity is crucial to maintaining healthy plants. Proper watering techniques and fertilization schedules are key to providing the necessary nutrients for your bromeliads to thrive. Repotting and propagation methods can help you refresh and expand your collection while dealing with common pests and diseases that can prevent issues from arising.
Finally, arranging your bromeliads creatively can enhance their beauty, and troubleshooting common issues such as yellowing leaves or lack of flowering can ensure their longevity. Remember to adjust care routines according to the seasons and enjoy the stunning beauty your bromeliads provide.
Thank you for trusting me to provide you with this comprehensive guide to bromeliad care. If you encounter any further questions or concerns, do not hesitate to reach out to me for further assistance.
FAQ
Q: How often should I water my bromeliad?
A: Bromeliads should be watered once every one to two weeks. It’s important to let the soil dry out slightly between waterings, but be sure to keep the central cup filled with water to maintain humidity.
Q: Can I grow bromeliads indoors?
A: Bromeliads can thrive indoors if provided with the right conditions. They prefer bright, indirect light and a temperature range of 60-80°F. You should also mist their leaves occasionally to replicate the humidity they would receive in their natural habitat.
Q: How do I propagate bromeliads?
A: Bromeliads can be easily propagated by removing offsets or pups that grow from the mother plant’s base. Gently separate the pup from the mother plant and plant it in a separate container with well-draining soil to encourage its growth.
Q: What should I do if my bromeliad’s leaves are turning yellow?
A: Yellowing leaves can be a sign of either overwatering or underwatering. Check the moisture level of the soil and adjust your watering accordingly. Additionally, make sure the plant is not receiving direct sunlight, as this can cause sunburn on the leaves.
Q: How often should I fertilize my bromeliad?
A: Bromeliads should be fertilized once every one to two months during the growing season (spring and summer) using a balanced liquid fertilizer. Avoid fertilizing during the winter months when the plant is dormant.
Q: Can bromeliads be planted directly in the ground?
A: Bromeliads can be planted directly in the ground in suitable climates. Ensure the soil is well-draining and amend it with organic matter to improve moisture retention. Select a location with partial shade to protect the plant from intense sunlight.
Q: How do I prevent pests from affecting my bromeliads?
A: To prevent pests, regularly inspect your bromeliads for signs of infestation, such as webs or discoloration. Treat any pests with insecticidal soap or horticultural oil if you detect them. Additionally, avoid overwatering, as stagnant water can attract pests.
Q: How can I encourage my bromeliad to bloom?
A: Bromeliads typically flower once in their lifetime and can take several years to bloom. To encourage blooming, provide your plant with bright, indirect light and maintain a consistent temperature range. You can also use a bloom-boosting fertilizer during the growing season as directed.
Q: What should I do if my bromeliad’s leaves are wilting?
A: Wilting leaves can indicate underwatering. Ensure that you are providing enough water to keep the central cup filled and the soil slightly moist. If the wilting persists, check for any root rot, which may require repotting the plant in fresh, well-draining soil.